Creating Subscriptions
Now that you have
installed and configured the distributor, enabled publishing, and
created a publication, you can create subscriptions.
Remember that two types of
subscriptions can be created: push or pull. Pull subscriptions allow
remote sites to subscribe to any publication that they are allowed to,
but for this to work, you must be confident that the administrators at
the other sites have properly configured the subscriptions at their
sites. Push subscriptions are easier to create because all the
subscription processes are performed and administered from the
publication/distributor point of view. This also makes using them the
most common approach.
For this example, we use the New Subscription Wizard to create a push subscription:
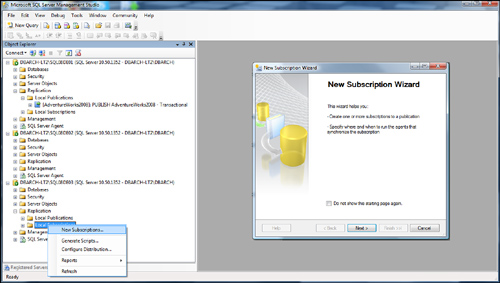
1. | In SQL Server Management Studio, locate the Replication node under the publication server (the DBARCH-LT2\SQL08DE01 named instance in this example) or the Replication node under the subscription server (the DBARCH-LT2\SQL08DE03
named instance in this example). You can create a push subscription
from either (but we use the subscription server here). Open the Replication node, navigate to the Local Subscription branch, right-click, and choose the New Subscriptions option. As you can see in Figure 22,
choosing this option launches the New Subscription Wizard, where you
can create one or more subscriptions to a publication and specify where
and when to run the agents that synchronize the subscription.
|
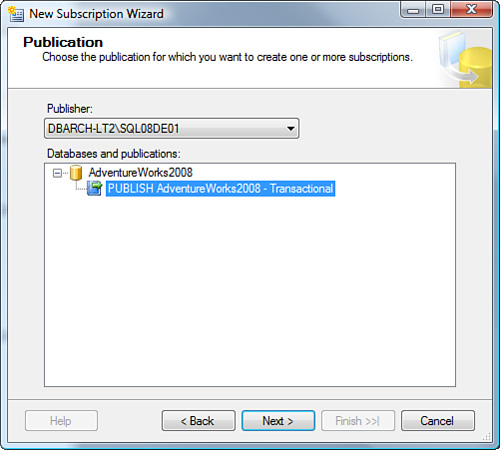
2. | You
first need to identify the publisher and publication from which you
want to create one or more subscriptions. As you can see in Figure 23, we have specified the publisher (DBARCH-LT2\SQL08DE01) and the publication that has been created for the AdventureWorks2008 database.
|
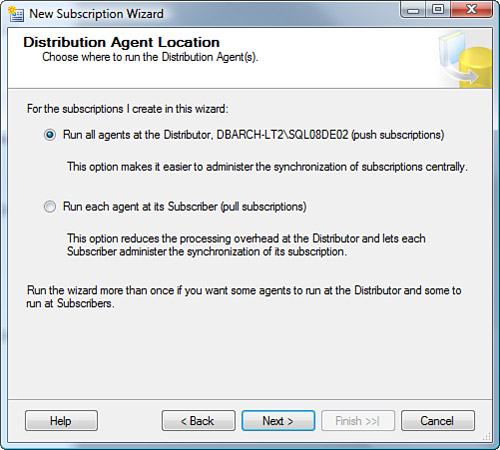
3. | When
you are presented with the option of where the replication agents will
be run for the subscription, choose the first option—having the agents
run at the distributor. This makes it a push subscription, which is much
easier to control and manage centrally than a pull subscription (as
shown in Figure 24).
|
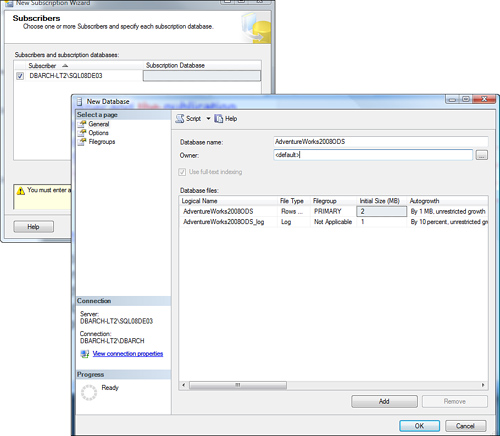
4. | Next,
the New Database dialog appears, asking you to identify the database
target for the subscription and the physical database files for its
allocation (assuming that you want to create this from scratch using
this wizard process). Figure 25 shows this New Database dialog, with the target database named AdventureWorks2008ODS.
Essentially, we have decided to create a subscription that will
continuously flow data from the publisher to the subscriber for all
tables in the publication. This continuous replication at the
transactional level effectively creates a mirror image of the data for
operational usage. That’s why we have used the suffix ODS, for
Operational Data Store, for the new database. This is a typical industry
usage of replication that takes all read-only access to OLTP data and
offloads it to the ODS copy of the same data (which is as close to
up-to-date as the last transaction that was replicated to it).
|
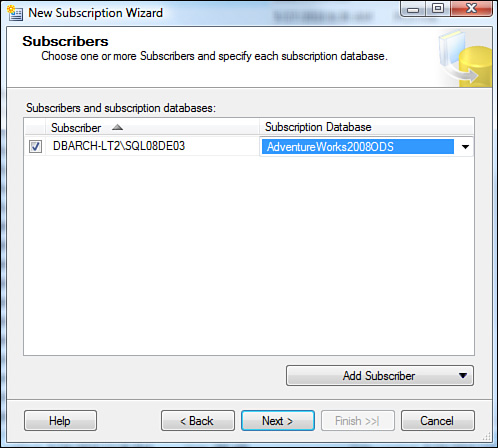
5. | In the Subscribers screen, with the new entry for the target subscriber server (the DBARCH-LT2\SQL08DE03 named instance in this example), check the box for the target subscription server. Figure 26 shows this subscriber server and the subscription database target.
|
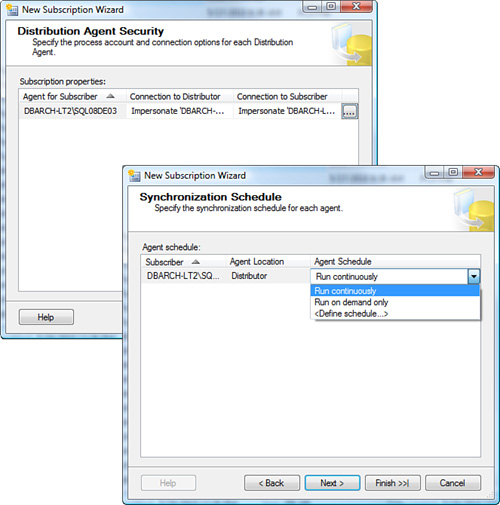
6. | Specify
the process account and connection options for the distribution agent
(to connect to the subscription server). Typically, you choose the
option to use a domain account or choose to impersonate the process
account (shown in Figure 27).
|
7. | Specify
the synchronization schedule for each agent. You want the distribution
agent to run continuously, but you also have the options to run on a
schedule and on demand (as shown in Figure 27).
|
8. | Specify
the initialization of the subscription. You want the subscription to be
initialized immediately, but, depending on the size of the database,
this might be accomplished manually with a database backup of the
publication database.
|
9. | On
the next screen, which lists the New Subscription Wizard actions,
choose to create the subscription and generate a script file with all
the steps to create the subscription for use later.
|
10. | On the next wizard dialog, identify the location of the script to be generated. As shown in Figure 28,
you are presented with the final wizard summary screen. Click Finish to
create your subscription, initialize the subscription database, and
enjoy a full transactional replication implementation.
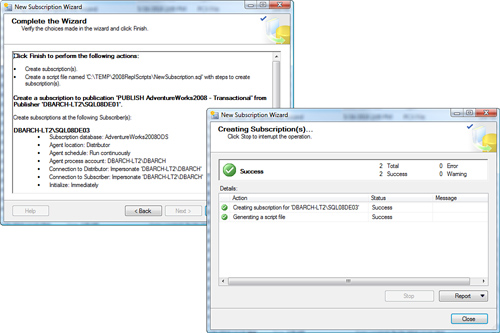
After you click Finish, the create subscription process starts and goes
through each step. Remember to check for errors or warnings if any
errors occur. When this process completes, you wait for the agents to
initialize the target database and start replication to the subscriber.
If you have specified that the schema and data be created immediately,
things start happening quickly. The distribution agent finishes the job.
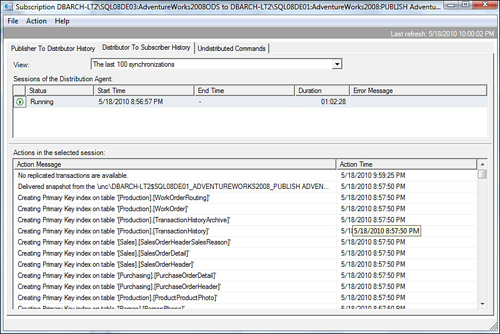
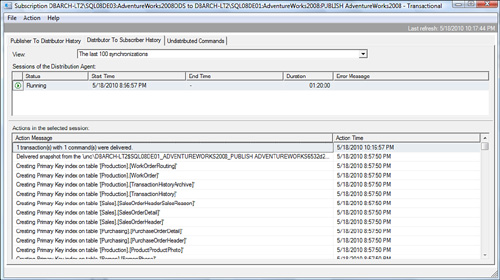
As you can see in Figure 29,
the distribution agent applies the schemas to the subscriber (as viewed
from the Replication Monitor’s Distributor to Subscriber History tab).
The bulk copying of the data into the tables on the subscriber side
follows accordingly. After this bulk copying is done, the initialization
step is completed, and active replication begins.
|
The complete replication buildup is finished, and you should be fully functional for replicating transactions to the subscriber.
Figure 30
shows what the replication buildup looks like from the Replication
Monitor as transactions flow through the replication topology. This
screenshot shows the transaction counts and commands being delivered on
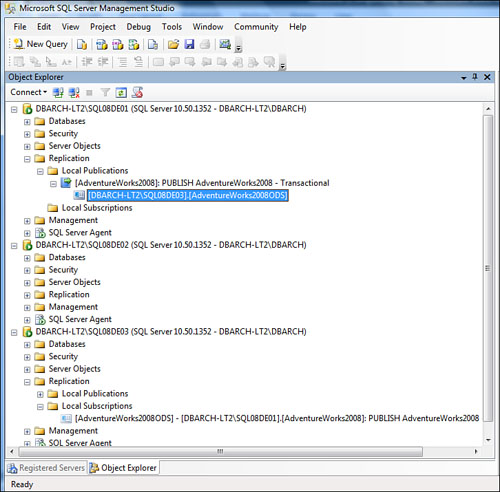
the last leg in the journey (from the distributor to a subscriber). Figure 31 shows the full replication topology that was built (Publisher, Distributor and Subscriber).
Your replication topology is now completely functional and will replicate flawlessly for as long as you require.